I made an AI that writes exams for me.
I made an AI that writes exams for me.

So, I am a college student and I had the last Term End Exam (a.k.a TEE) in my sophomore year. I had this teacher who said write 4 pages for each question as they all have 10 marks each and the subject which I am talking about is quite theoretical so literally Eeman != Alive x_x. Then it hit me oh what if I make an AI for this! And here we are.
Disclamer:
This is an reminder that no I have not used this project to give exams in any place. I respect my teachers and this is just a fun project and the method of how to know if the answersheets are generated by AI will also be told.
So, what are exams?
As an programmer exams are just an array of questions that need to be understood using NLU (Natural Language Understanding) and an array of answers based on the question that needs to be given using NLG (Natural Language Generation).
So, what I need my model to have is to awesome NLG and NLU capabilities. Large Language Models are famous for this. So yeah I am gonna use GPT-3 ofc cuz I dont have the time and the resources to rain my own large language model.
How will the automation system work?
- Input questions: The first step is to input a list of questions into the app. You can enter the questions one at a time, separated by commas, or you can paste in a pre-existing list.
- Text processing: The app processes the text by splitting it into individual questions and using regular expressions to remove any trailing punctuation.
- Text generation: The app sends each question to OpenAI’s text-generation API and waits for a response. Once a response is received, the app stores it in an array.
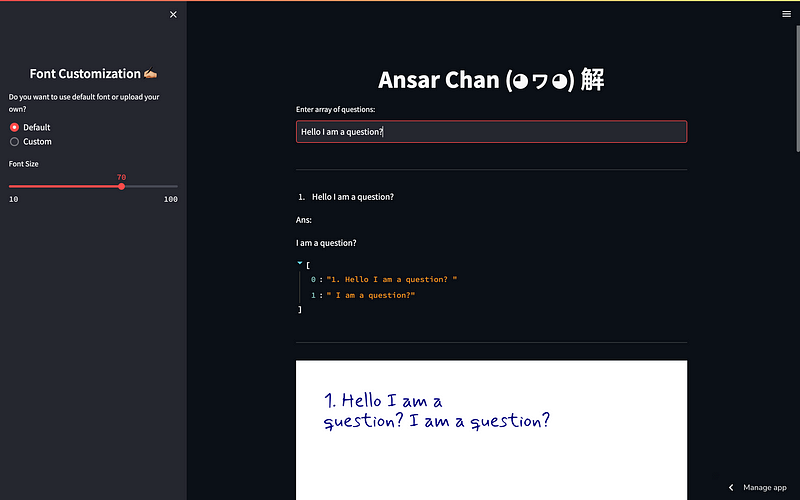
- Visual display: Finally, the app displays the questions and answers in a visually appealing format. The answers are split into chunks of 21 words and displayed on a background image.
For More Detailed Look Go Here: https://github.com/Eeman1113/Examinee_AI/blob/main/README.md
Lets make it.
First things first lets set up all the imports we need for this:
Define a fuction called add_newlines_and_split that takes a string text as input, adds a newline character after every 5th word, splits the resulting string into lines, and then splits those lines into chunks of 21 lines each. Finally, it joins each chunk into a single string and returns a list of these strings.
Define a function group_elements that takes a list lst and an integer n as input, groups the elements of the list into sublists of length n, and returns a list of these sublists. If the number of elements in the input list is odd, the function appends an empty string to the list of sublists to make it even.
Define function add_newline_after_question that takes a list of strings arr as input, adds a newline character after every question mark in each string, and returns the modified list.
This code creates a font customization sidebar for a web application using the streamlit library. Here is an explanation of each step:
- The code uses the
markdown()method of thest.sidebarobject to display a heading in the sidebar.
st.sidebar.markdown("<h1 style='text-align: center; '>Font Customization ✍🏼</h1>", unsafe_allow_html=True)2. The code initializes two Boolean variables, agree and cus, to True and False, respectively.
agree = True
cus = False
3.The code creates a radio button using the radio() method of the st.sidebar() object, allowing the user to choose between using the default font or uploading a custom font. The choice made by the user is stored in the mistake variable.
mistake=st.sidebar.radio("Do you want to use default font or upload your own?",('Default','Custom'))4. If the user chooses the default font option, the agree variable is set to True and the cus variable is set to False. Otherwise, the agree variable is set to False and the cus variable is set to True.
if mistake == 'Default':
    agree = True
    cus = False
else:
    agree = False
    cus = True
5. The code creates a slider using the slider() method of the st.sidebar object, allowing the user to select the font size. The minimum value of the slider is 10, the maximum value is 100, and the default value is 70. The selected value is stored in the fo_sz variable.
fo_sz = st.sidebar.slider("Font Size", 10, 100, 70)6. If the user has chosen to upload a custom font, the code displays a file uploader using the file_uploader() method of the st.sidebar object. The user can upload a .ttf font file. The uploaded file is stored in the cus_fon variable. If the user has not yet uploaded a file, the code displays a message to wait for the file to be uploaded, and uses a sample font file as a placeholder. If the user has uploaded a file, the code saves the file as a .ttf file in the fonts/ directory and sets the cus_fon variable to the path of the saved file. If the user has not chosen to upload a custom font, the cus variable is set to False and the agree variable is set to True.
if cus:
agree = False
cus_fon = st.sidebar.file_uploader("Upload Font", type=["ttf"])
# time.sleep(5)
if cus_fon is None:
st.sidebar.write("Waiting for da font......")
st.sidebar.write("Take your time upload...here is sample output while I wait")
st.sidebar.markdown("")
cus_fon="fonts/Mynerve-Regular.ttf"
cus = False
agree = True
else:
st.sidebar.write("Font uploaded")
st.sidebar.write("Answering your questions now...")
st.sidebar.markdown("")
#save cuz_fon as a .ttf file at fonts/
file=open("fonts/{}".format(cus_fon.name),"wb")
file.write(cus_fon.getbuffer())
file.close()
cus_fon="fonts/{}".format(cus_fon.name)The whole code of this section looks like this:
Add the title and take the question input:
So, now onto the next part of the code. In this section we are using the Python openai package to generate answers to questions by making use of OpenAI's GPT (Generative Pre-trained Transformer) language model.
First, the re module is used to split the input text a into a list of sentences based on the presence of the characters . or ?. This is achieved using the split() method with a regular expression pattern [?.], which matches either . or ?. The resulting list q contains all the sentences from the input text that end with either . or ?.
Next, an empty list c and a counter variable d are initialized. For each sentence i in the list q, an OpenAI API call is made using the openai.Completion.create() method. The engine parameter specifies the name of the GPT language model to use. Here, we are using the "text-curie-001" engine.
The prompt parameter specifies the input prompt for the language model. In this case, we append a ? to the end of each sentence in q and use that as the prompt. The language model will then try to generate a continuation of the sentence that answers the given question.
The temperature parameter controls the creativity of the generated responses. A higher temperature value will result in more creative responses, while a lower value will result in more conservative responses.
The max_tokens parameter specifies the maximum number of tokens (words or subwords) in the generated response. The top_p parameter specifies the probability mass that should be used to select the next token. A higher top_p value will result in more diverse responses.
The frequency_penalty and presence_penalty parameters are used to discourage the language model from repeating itself or generating irrelevant responses.
For each sentence i in q, the counter d is incremented and the response from the OpenAI API call is appended to the list c along with the sentence number and prompt. The response is also displayed in the Streamlit app using the st.write() function. Finally, a horizontal line is added using st.markdown() to separate each question and answer pair.
Now lets print our output fansyly:
Now this part of the code is generating images and displaying them using the Streamlit library. If the agree variable is True, the code creates an image using a pre-defined font and saves it as a PNG file. Then, it displays the image on the Streamlit app using the st.image() function. If the cus variable is True, it uses a custom font and font size to generate and display the image. Finally, it displays balloons using the st.balloons() function.
Lastly one small code block to check how many times answer chan has been used in that particular session:
Well Thats The End Of The Code. Pretty long one.
Lets see the results.
Before that here is a Readme:
Ansar Chan (◕ヮ◕) 解 Try Me: https://eeman1113-examinee-ai-app-l02w1q.streamlit.app Have you ever had a list of questions…github.com
Now Lets Look At The Final App:

Go try it its awesome it fun to use and honestly I dunno why I spent more than 72 hrs of my life on this. Just needed a break I guess. Its been long since I have written an article sorry for the delay.
We reached 500+ followers thanks alot!! It helps me so much to stay motivated and keep on going.
Thanks alot for reading my weird nerd stuff.
I appreciate you guys alot.
If you wanna see the code visit my github:
If you are up for hiring or just have doubts realted to AI contact me on LinkedIn:

Yeah I know this one was kind of a click bait. Sorry lemme have fun okiee :) I was getting so bored of life becoming a loop so I made this project.
Thanks for reading 😁, See ya guys very soon👋🏼